You’ve drawn your own Hoppy Frog. You are now choosing to continue on to the digital coloring section. Before you continue you should download and install the Hoppy Frog Color Pallet that is also available on my resources page.
Once you have the Pallet installed, let's begin.
c1- Rear Legs
Step 16
- Select All of the Linework (ctrl + A) and copy it (ctrl + C)
- Now turn off the linework layer, and make the color layer active.
- On the color layer, place the copied linework in the same place (ctrl +F)
- Select Rear legs and apply Frog Gradient 1.
- Using the Gradient Tool (G), rotate the gradient and change the radial shape to an ellipse using the handle shown highlighted with a red circle in the above image.
- Repeat this with the other rear leg. Be sure to turn off the stroke on both legs.
c2- Body
Step 17
• Select Body and apply Frog Gradient 3.• Using the Gradient Tool (G), change the radial shape to an ellipse using the handles shown highlighted with a red circle in the image above.
• Turn off the stroke on the body.
c3- Chest
Step 18
- Select the uppermost Chest Segment and apply Frog Gradient 4.
- Using the Gradient Tool (G), change the radial shape to an ellipse and reposition the placement of the gradient as shown.
- Do the same for each consecutive chest section making the gradient ellipse more condense as you progress down the body.
- Don’t forget to turn off the stroke on all the chest segments as you go. (I did, but I’ve managed to forgive myself)
- Give a final adjustment to the gradients until you are satisfied with the final results.
- You should have a “ribbed” looking result as shown below.
NOTE: A similar look can be achieved by using Gradient Meshes. I believe this way is easier. However, I will be demonstrating the use of Gradient Meshes in a future tutorial.
c4- Rear Feet
Step 19
- Select the Rear Feet and apply 2-Medium Frog Green.
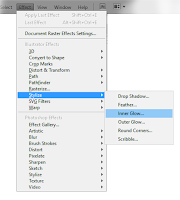
- Then on the tool bar, go to Effect > Stylize > Inner Glow. . . (see below)
- Apply the settings shown above. Use 3-Light Frog Green for the Screening color.

c5- Front Feet
Step 20
- Select the Front Feet and apply Frog Gradient 3.
- Using the Gradient Tool (G), change the radial shape to an ellipse and reposition the placement of the gradient as shown.
- With the front foot selected, go to Effect > Stylize > Inner Glow. . . and use the settings shown below. Use 3-Light Frog Green for the Screening color.
- Be sure to turn off the stroke on both feet.
c6- Head & Eyes
Step 21
- Select the Head, the upper eye lids, and the lower eye lids, and apply Frog Gradient 2 with the default settings.
- Make the eye irises white.
- Make the eye pupil black.
- Remove the stroke from all head and eye parts.
c7- Mouth
Step 22
- Select the Mouth, and apply 1-Dark Frog Green.
- Select the Tongue, and apply 4-Frog Tongue.
- With the Tongue selected, go to Effect > Stylize > Inner Glow. . . and use the settings shown below. Use 4-Frog Tongue for the Lighten color.
c8- Spots
Step 23
- Select all the spots, and apply Frog Gradient 2 with the default settings.
- Be sure to remove the stroke from the spots
Congratulations!!!!
You’ve drawn and colored your own Hoppy Frog. I hope you enjoyed this tutorial, and I’d love to see what you’ve created.Did you find this tutorial easy to follow?
Let me know in the comments section if you have any questions. I’d be more than happy to clarify any confusing points.
Once again, thank you for following this tutorial all the way through to the end.
If you are interested, I’ll have the coloring sheet for Hoppy Frog available for free download on my resource page. If you’d like to have this tutorial in a PDF, please sign up for my newsletter. I’ll be sending those out once monthly, and they’ll be packed full of NoNoriginal goodies.
Later,
NoNo


Comments
Post a Comment